Simple PHP7, SQLite3, and AJAX Tutorial
Posted on 2018/02/16 at 11:26 pm

Using PHP and AJAX can be somewhat confusing. But, the benefits are countless when it comes to doing web related projects. So, I wanted to do a simple tutorial/example of how to get things setup and how to do some basic insert and retrieval of data. For this project, I'm using PHP7, SQLite3, AJAX, Firefox, and Atom. You can use any browser with debugging options and any integrated development environment (IDE) or text editor you want. I choose SQLite3 as my database because it's lightweight and good for applications that need a database.
- Setup
- HTML
- PHP
- Conclusion
Setup
Creating The Layout & Files
Ultimately, my file and directory layout looks like this:
├── ajaxNphp  // This is my working dir
       ├── index.html
       ├── process.php
       └── resources
           └── server.db
The ajaxNphp folder is the root folder of this project. In this folder, we have a resources folder that holds the database and can hold CSS and JavaScript files among other stuff. Note: For this project, JavaScript and CSS are inline to the files! I'm trying to keep this as simple as possible. For this part, I recommend using the terminal since it can be faster and we will use it for some other stuff during this project. So, KEEP IT UP! Anyway, My project is located in my Downloads folder under the ajaxNphp folder. So, I open a terminal and type:
cd ~/Downloads/ajaxNphp/
The tilda (~) means your home folder and the rest is pretty self explanatory. I then do:
mkdir resources && touch index.html process.php
This creates the resources directory where our database will go; if successful, it will then create our PHP and HTML files that we will use for the project. The next part is for us to actually install the tools so we can setup our database and start writing code.
The Tools
I'm using an Ubuntu based operating system so I'll show the commands you need to get PHP7, SQLite3, and Firefox installed.
sudo apt-get install sqlite3 php-sqlite3 php firefox
OK, now let's just check that we have the proper versions installed.
PHP Check
// This will somewhat cleanup the version info on retrieval
    php -v | awk '{ print $1 $2 }' | head -n1
    // I get PHP7.0.25-0ubuntu0.16.04.1 which is PHP 7.0.25, so I'm set.
SQLite Check
sqlite -version
    // I get 2.8.17

    // If you do too, try:
    sqlite3 -version
    // If you get a return, then you are set for SQLite3.
    // I get a return value so am set.
Ok, so now we need to determine an environment to work with. I recommend Atom because it has a robust set of plugins and themes that make it more pleasant to work with. You'll need to get it through their website if you wish to use the same thing; but, any text editor will suit this project.
Setup The Database
OK, so we now need to setup a database that we can query and insert to by using AJAX, PHP7, and SQLite3. I hope you've kept your terminal open as we will now change directory (cd) into the resources directory and launch SQLite3. So, here is what we do:
cd resources/ && sqlite3 server.db
We will then be presented with:
SQLite version <Your SQLite3 Version>;
    Enter ".help" for usage hints.
    sqlite>;
If you are seeing this, then let's go ahead and create our database. I setup three columns for this project and they are title, date, and link. Recall, I'm doing a movies database so the first is for movie titles. The second is for when it was released, and the third is the cover image. So let's create the table in our database.
Simply do:
CREATE TABLE Movies(title MAX, date varchar(10), link MAX);
If it was successful, you should see NO ERRORS and if you run :
.tables
you'll get it returned. MAX means that the field can take the largest string possible. The varchar(10) means the field is limited to ten characters. There are other data types such as ints, but we will ignore them for now. Now, let's insert some initial movie data by doing these below commands one at a time. Make sure there is an ending semi-colon for each!
// Date is in MM/DD/YYYY format

    INSERT INTO Movies VALUES('Alien', '05/25/1979', 'https://images-na.ssl-images-amazon.com/images/I/61ujvw4OXNL._SX342_.jpg');

    INSERT INTO Movies VALUES('Contact', '07/11/1997', 'http://www.filmsgraded.com/posters/01/1/8/8/84a.jpg');

    INSERT INTO Movies VALUES('Paul', '03/18/2011', 'https://upload.wikimedia.org/wikipedia/en/thumb/9/96/Paul_poster.jpg/215px-Paul_poster.jpg');

    // Check your work
    SELECT * FROM Movies;
    // You should see the data you entered returned.

    // If so, then simply exit.
    .exit
Excellent! The commands are pretty simple to understand. They even give a hint of what is going on. We use "INSERT INTO" to start the insert process. We reference our "Movies" table we created and then pass "VALUES" which match up with our title, date, link table layout. We end each command with a semi-colon. Next, we need a server to process PHP commands, interpret our form data, retrieve our data, etc.
Setup The Server
There are many servers out there one can use and there are some servers that are for testing. If you want to see some options, read my post on Quick Test Servers. For this project, I'm using PHP's built in server used for testing since it will process PHP and our HTML files.
If you've kept the terminal up do this:
cd .. && php -S 127.0.0.1:1212
It's pretty straightforward for what we are doing here. We moved back to the top directory of the project using cd .. since we only moved down one directory, We then use the "php" command with "-S" as a switch to use its server. We give "-S" an argument of "localhost" (127.0.0.1) and a port of 1212. The port needs to be bigger than 1024 since any port lower and equal to that requires sudo to use. It then waits to process requests. We can use ctrl + c to kill the server which can be helpful for when we want to use ctrl + l to clear the terminal screen of any text output and restart. When your project is complete, you can omit the change directory command and just do the PHP et all part. Add an "&" to the command so that the process is persistent even if the terminal closes. Now, we are truly ready to code!
HTML
Our Basic HTML Template
Let's start off with a basic HTML template that we will add to shortly:
<!DOCTYPE html>
<html>
<head>
    <meta charset="utf-8">
    <title>Test AJAX/PHP</title>

    <script type="text/javascript">
    </script>

</head>
<body>

    <h2>Save Movie Info</h2>
    <form action="process.php" method="post">
    <input type="text" title="Title" placeholder="Title" name="Title" value="">
    <input type="text" title="Date" placeholder="Date" name="Date" value="">
    <input type="text" title="Link" placeholder="Link" name="Link" value="">
    <input type="submit" name="saveInfo" value="Save">
    <button type="reset" value="Reset">Clear</button>
    </forn>


    <br/><br/>
    <h2>Search Movie Info</h2>
    <form>
    <input type="text" name="searchField"
    title="Search"
    placeholder="Search..."
    onkeyup="getData(this.value)"/>
    </form>
    <br/><br/>


    <div id="dynDataField"></div>
</body>
</html>
Let's break this down. We have two forms with their own input fields. One form is used for saving new movie entries and the other searches the database and gets the data back. The form that saves new movie info has three fields and a submit button. The three fields correspond to the three columns in our database and Movies table. The submit action uses the forms submit action to send our process.php script POST data about the form for processing.
The search form has one input field and an onkeyup event that calls a function called "getData". This function has a parameter passed to it of "this.value" which will take the query that one has typed in. AJAX will be used in this instance to get data from the server as we type in a character. We have a div tag with an ID of "dynDataField" that we will reference to insert the returned data from the server. This is our bare bones HTML. But, it is pretty useless. Clicking any of the buttons or typing a search does nothing. So, let's create an AJAX script to get our already entered data!
AJAX
AJAX Search Script
At the heart of AJAX, there are 4 core steps for GET and 5 core steps for POST.
- Create an XMLHttpRequest object
- Setup an onreadystatechange function for the XMLHttpRequest object
- Open a connection with the XMLHttpRequest object
- With POST: Setup a setRequestHeader with an XMLHttpRequest object
- Send the data with an XMLHttpRequest object
    // Step 1: Create object
    var xhttp = new XMLHttpRequest();  // Create the xhttp object
    // Step 2: Setup an onreadystatechange function for the XMLHttpRequest object
    // This is actually run after send is done and the server spits out info.
    xhttp.onreadystatechange = function() {
        // Confirm we have a  successful connection. Then, receive the response info.
        // For PHP it is echo that sends it.
        // Loops seem to cause this to wait which means an array can be traversed
        // and the output could be written as a table, etc.
        if (this.readyState == 4 && this.status == 200) {
            // do something with the returned data
        }
    };
    // Step 3: Open connection
    // More or less, open a connection: @Params POST or GET, path to XML page or php script, set async t/f
    xhttp.open("GET", "process.php", true);
    // Step 4: Send the data and let server process it.
    //         After done processing it, onreadystatechange is triggered.
    xhttp.send();    // Start the process and send GET data


    //      For POST do and add these changes
    //  xhttp.open("POST", "process.php", true);
    // Used in POST to setup data types like JSON, XML, etc... MUST BE DONE AFTER OPEN
    // xhttp.setRequestHeader("Content-type", "application/x-www-form-urlencoded");
    // Example data structure for Sending POST with above RequestHeader. See that this mimics GET
    // xhttp.send("fname=Henry&lname=Ford");
    // xhttp.sebnd(formData);  // Can use a string variable with formatted data structure instead
The above is the process. Here is what we setup in our scripts tag that's in the head tag:
function getData(query) {
    if (query == "") {
        document.getElementById("dynDataField").innerHTML = "<p></p>";
        return;
    } else {
        var xhttp = new XMLHttpRequest();  // Create the xhttp object
        var formData = "dbQuery=" + query; // Our query being setup for processing
        // This is actually run after open and send are done
        xhttp.onreadystatechange = function() {
            if (this.readyState == 4 && this.status == 200) {
                updatePage(this);  // Send the returned data to further process
            }
        };
        xhttp.open("POST", "process.php", true);  // Open the connection
        xhttp.setRequestHeader("Content-type", "application/x-www-form-urlencoded");
        xhttp.send(formData);    // Start the process

    }
}

function updatePage(returnData) {
    // Get the echoed data and insert to div of dynDataField
    document.getElementById("dynDataField").innerHTML = returnData.responseText;
}
OK, so we have two functions here. One is for getting the data and the other inserts the results into our div. Get data checks to see if the input field is empty and if so leaves things as they are. If there is data in the field, it is then inserted into a variable "formData" and tied in with "dbQuery=". This is what PHP will look at and use to insert into a database query. We then setup a statechange listener to wait for the server to finish processing the search and we send the result to the other function.
After this setup part, we do the standard open process but use POST instead of GET. Then, we tell the server what kind of data this is. Recall, GET defines it for us but is limited and less secure while POST has more data formats and better security but we have to define it using the setrequestheader. We then send the data in its formatted string to the server for processing. This w3schools link has some more info about each part. In this instance, the PHP script transfers a string back to the requester. Note, we can transfer JSON, XML, and other data. But, a string or "responseText" is good for now.
Alright, all that's left is to write our PHP script to process the search and our insert to table option.
PHP
Base PHP
We have three core parts for the PHP project. We want to determine which form sent the POST. We then call one of two functions. One function will search the database. The other function will insert to the database.
Here is the basic setup:
<?php
// Retrieve data
function searchDB($QUERY) {
}
// Save new entry
function saveInfo($TITLE, $DATE, $INFOLINK) {
}
// Determin action
if(isset($_POST['saveInfo'])) {
saveInfo($_POST["Title"], $_POST["Date"], $_POST["Link"]);
} elseif (isset($_POST['dbQuery'])) {
searchDB($_POST['dbQuery']);
} else {
echo "<h2 style='width:100%;background-color:#ff0000;color:#ffffff;text-align:center;'>Error! Illegal Access Method!</h2>";
}
?>
The part of interest here is the the determine action section. This is how we determine which function to call when a form is submitted or an AJAX call is made. If neither call the script, we drop an error and exit the script. We are simply checking if "saveInfo" or "dbQuery" are set. We then call the proper function and pass the data that is sent. Let's now setup our search function.
Search Function
As you might have seen, we are calling our search function "searchDB" and we are passing the "dbQuery" value to it.
So let's see how we connect to the database and return data:
try {
$serverPDO = new SQLite3('resources/server.db');
$query = "SELECT * FROM Movies WHERE title LIKE '%" . $QUERY . "%' OR " .
"date LIKE '%" . $QUERY . "%' OR " .
"link LIKE '%" . $QUERY . "%'";
$result = $serverPDO->query($query);
while ($row = $result->fetchArray()) {
echo "<div style='float: left;margin-left: 1em; margin-right: 1em;'>" .
"<a href=" . $row["link"] ." target='blank'>" .
"<img style='width:8em; height:10em;' src='" . $row["link"] . "'/></a><br/>" .
"Title: " . $row["title"] .
"<br/>Date: " . $row["date"] . "</div>";
}
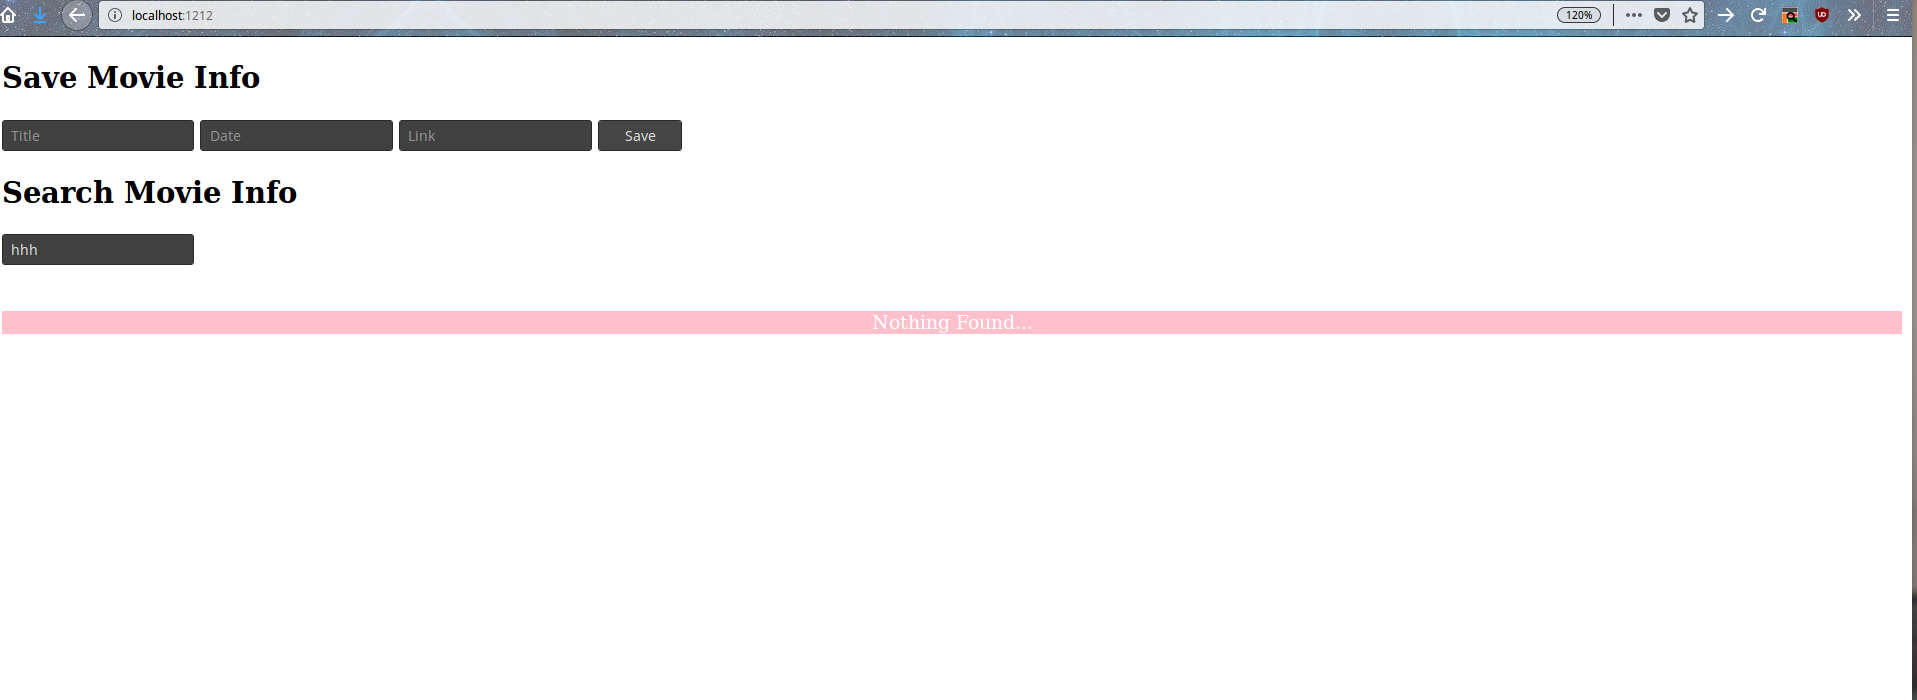
if ($result->fetchArray() == 0) {
echo "<div style='float:left;width:100%; background-color:pink;color:#ffffff;text-align:center;'>Nothing Found...</div>";
} else {
echo "<div style='float:left;margin-top:2em;width:100%; background-color:lightgreen;color:#ffffff;text-align:center;'>Search Completed...</div>";
}
} catch (Exception $e) {
echo "<h2 style='width:100%; background-color:ff0000;color:#ffffff;text-align:center;'>Error!</h2><br/>" . $e;
}
Let's break this down. In our "searchDB" function, we have a try catch block that checks any exception that might occur. Technically, we really should be more specific to what exceptions might occur but for now, this will suffice. We try to create an SQLite3 database object and give it a local path name of "resources/server.db". This is set to the "serverPDO" variable. We then create a "query" variable of type string that comprises of an SQL command that very broadly makes the database look at he table and see if any field matches the query. Please note, this is a very in-efficient way to do this as it looks at each field and then sees if any part is like the query both in upper, lower, and mixed casing. If we were being efficient, we'd base our queries on the columns and have either multiple input fields for the search with a "submit" button or use other techniques to keep the searches quick. Since this is a small database, performance isn't poor and we can get away with this in a general context. Take note that the VALUES section is ordered just like we ordered it when we created the table columns.
Anyway, we then execute the query and get the result set into the "result" variable. This is essentially a 2D array that comprises an array of result objects that then have an array of values for each object. This is why we use the while loop and access the "row" and then any values there in. We assign the values to a string formatted with HTML markup that is then echoed. After that, we echo whether we traversed an arrays by saying the search was or was not found.
As I understand it, the "onreadystatechange" is triggered after the script is finished. So, all echos are collected by "onreadystatechange" and once the script sends an exit code the "onreadystatechange" sends what was echoed to whatever you setup to collect and parse the data.
Insert Function
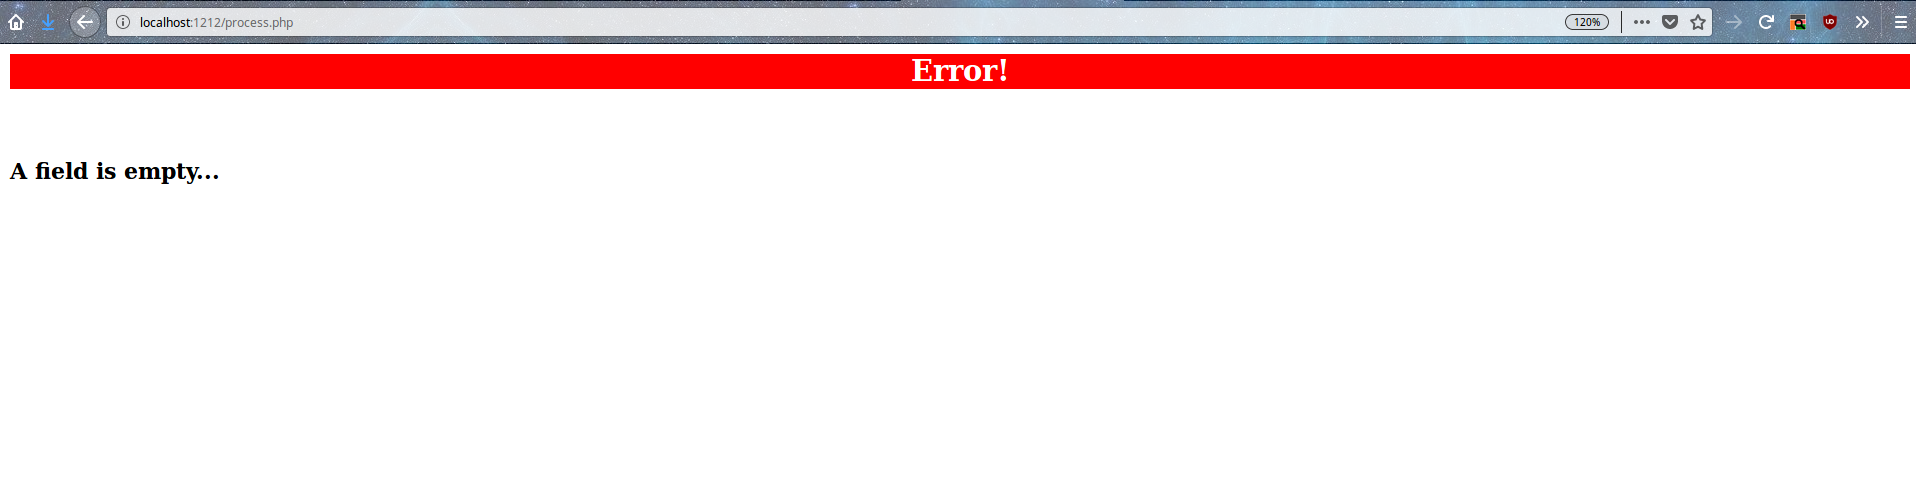
As you can tell, our insert function will take three parameters which are the title, date, and link.
if ($TITLE != "" && $DATE != "" && $INFOLINK != "") {
    try {
        $serverPDO = new SQLite3('resources/server.db');
        $command = "INSERT INTO Movies VALUES('" . $TITLE . "','" . $DATE . "','" . $INFOLINK . "')";
        $serverPDO->exec($command);

        echo "<h2 style='width:100%;background-color:#0000ff;color:#ffffff;text-align:center;'>Inserted to db...</h2><br/>" .
        "Title: " . $TITLE . "<br/>Date: " . $DATE . "<br/>Link: " . $INFOLINK;
    } catch (Exception $e) {
        echo "<h2 style='width:100%; background-color:ff0000;color:#ffffff;text-align:center;'>Error! Database Insert Failed...</h2><br/>" . $e;
    }
} else {
    echo "<h2 style='width:100%; background-color:ff0000;color:#ffffff;text-align:center;'>Error!</h2><br/>" .
    "<h3>A field is empty...</h3>" . $e;
}
Lets break this down. The first parts are pretty much the same as the search function with the exception of execute than query being the command. We also confirm that each field is filled and if not we generate an error HTML markup. We have a try catch block if they are filled. In the try section, we connect to the database. We create a "command" of type string that inserts the sent data from the form. We then echo a success or failure message. Take note that this insert process is not AJAX. Our page will redirect to the process.php file and the file will output HTML. I'm doing it this way to show you two ways of processing data and why AJAX is useful in that we aren't being redirected. As you can see, it's a much cleaner user experience to use AJAX and this PHP example shows why. You can change this to AJAX but I will leave that to you to figure out how.
Conclusion
Discussion
We are DONE! Pat yourself on the back and get a cold beer or favorite beverage. You now have new possibilities available to you since you understand the basic concepts. Let's do a quick recap and talk about pitfalls and the next steps one should take.
We start off by creating two files and one sub-folder. We then install our needed programs and a development environment. From there, we create our database in the sub-folder and the table in the database. It is important to recall that one of the fields is limited to a string size of 10. Anyway, we then entered some initial data so we could work with it after creating our code. After launching our PHP server, we create our initial HTML markup and talk about what we will do next. Next, we create our AJAX search script that checks against empties and so on. Since the HTML is done, we move on to the PHP. In the PHP, we check what's sending the request and determine the necessary action from the POST data. We create our two functions and their logic which get called after the initial checks. Once the script exits, our AJAX sees this and we end the data to a function that then inserts the data to a div tag OR we get an HTML output in the case of the data insert form. We then drink our beverage and think about pitfalls and the next project we will do based off the work done here.
Pitfalls
The first massive pitfall is that we aren't sanitizing our data. NEVER do a production project without cleaning input data! I skipped it here because I'm lazy and this article would get longer than I want it to. It can be pretty easy to do since there are libraries out there for both the frontend and backend. Always do backend checks since frontend checks can be easily circumvented. The next pitfall is that we aren't checking the length of the date field. Again, do this on both ends. Another pitfall is that the search function implements a poor query structure. I mentioned this before but we are collecting things to keep in mind so I'm mentioning it here too. I'm sure there are some other things of note but these three are the biggies. Let's look at what our next steps might be with such a project.
Next Steps
Here are some next steps to consider.
- New Projects:
- Use cookies to create a login system and account control to then access or create users for the database.
- Use cookies and AJAX to create a tracking system that'll insert data to the database about links clicked.
- Create a meta search engine.
- Create a password manager.
- Improve Current Project:
- Sanitize input fields to avoid exploits and future errors.
- Implement a date field length check.
- Make a better search system.
Result Images
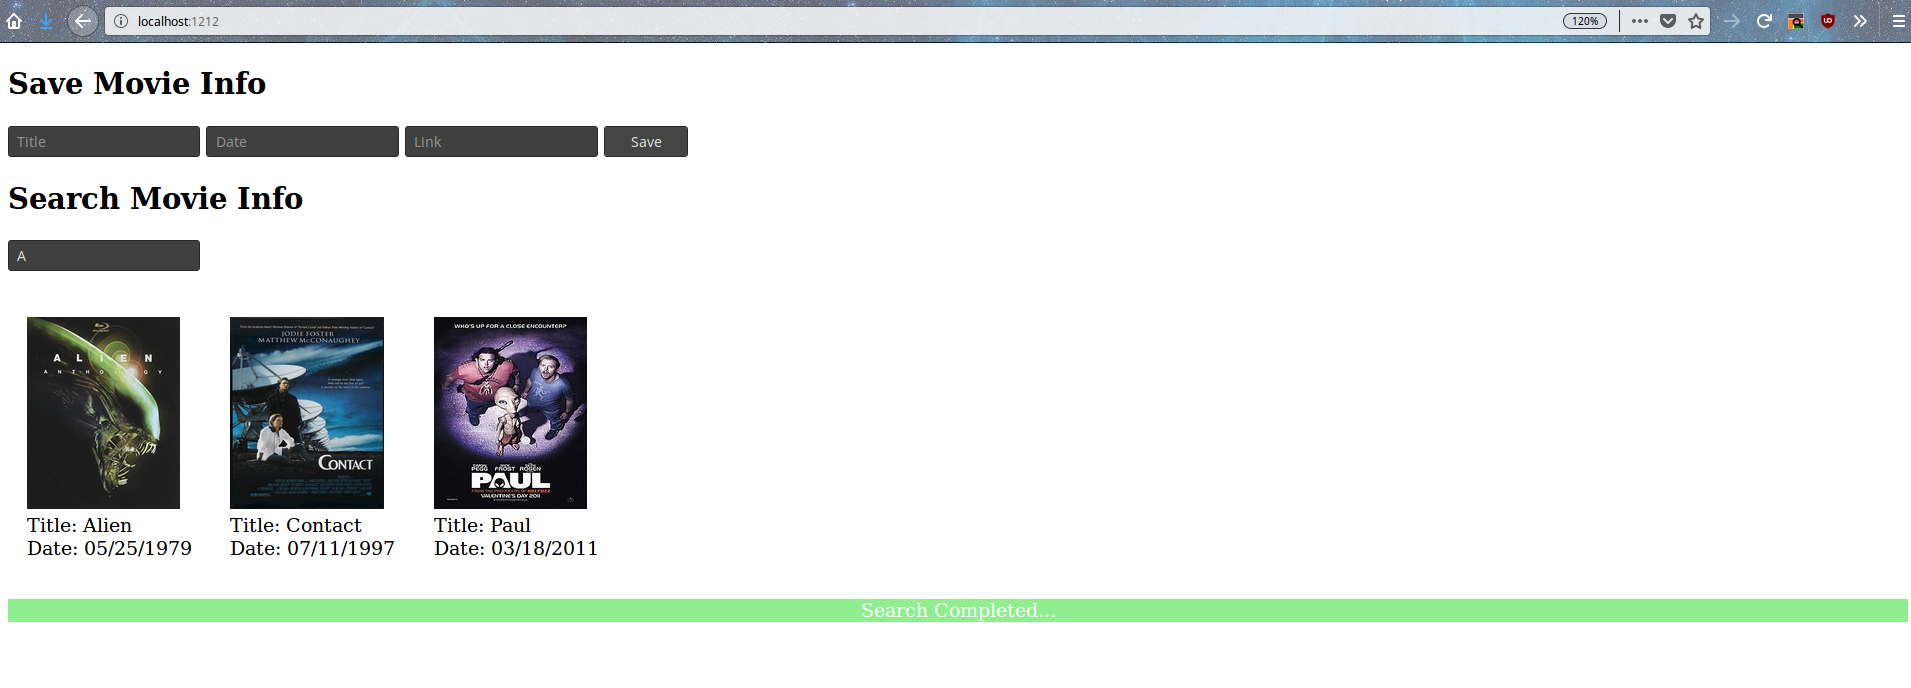 ajax and php result
 ajax and php result 2
 error handling
 error handling 2
 db insert
To Top
To Bottom